Understanding the CMU construction process helps contractors, builders, and homeowners plan masonry projects more effectively. Concrete masonry unit (CMU) walls are widely used because they offer strength, durability, fire resistance, and long-term structural performance.
This guide explains the typical CMU wall construction process from foundation preparation to final wall completion.
What Is the CMU Construction Process?
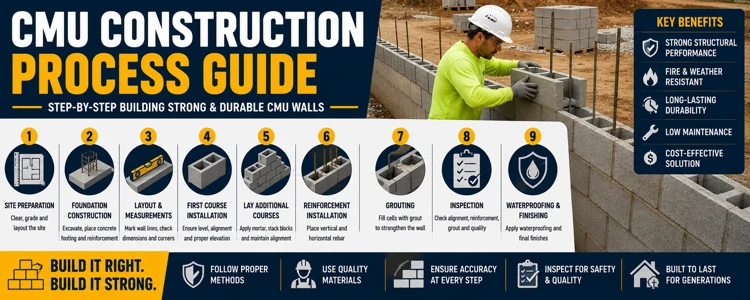
The CMU construction process is the step-by-step method used to build concrete block walls.
The process typically includes:
- Site preparation
- Foundation construction
- Layout and measurements
- Block installation
- Reinforcement placement
- Grouting
- Inspection
- Finishing work
Following proper procedures helps ensure structural integrity and long-term performance.
You can also read:
What Is a CMU Block?Step 1: Site Preparation
Before construction begins, the site must be prepared.
Typical preparation tasks include:
- Clearing debris
- Removing vegetation
- Grading the site
- Establishing wall locations
- Verifying dimensions
Proper site preparation improves construction accuracy.
Step 2: Foundation Construction
CMU walls require a stable foundation.
Foundation work may include:
- Excavation
- Footing construction
- Concrete placement
- Reinforcement installation
The foundation transfers wall loads safely into the soil.
You can also read:
CMU Foundation Wall GuideStep 3: Layout and Measurements
Accurate layout is critical.
Builders typically:
- Mark wall lines
- Check dimensions
- Verify corners
- Confirm opening locations
Careful measurements help prevent alignment problems later.
Step 4: Install the First Course
The first course is one of the most important parts of masonry construction.
Contractors must ensure:
- Proper alignment
- Correct elevation
- Accurate spacing
- Level installation
Mistakes in the first course can affect the entire wall.
Step 5: Lay Additional Courses
After the first course is complete, additional block courses are installed.
During this phase:
- Mortar is applied
- Blocks are aligned
- Vertical joints are staggered
- Wall dimensions are verified
This process continues until the desired wall height is reached.
Step 6: Install Reinforcement
Many masonry walls require reinforcement.
Common reinforcement includes:
- Vertical rebar
- Horizontal rebar
- Bond beam systems
Reinforcement improves:
- Structural strength
- Crack resistance
- Load capacity
You can also read:
How to Reinforce a CMU Walland
CMU Rebar Spacing GuideStep 7: Install Special CMU Blocks
Certain areas may require specialty blocks.
Common examples include:
- Bond beam blocks
- Lintel blocks
- Jamb blocks
- Pilaster blocks
These blocks help support structural requirements.
You can also read:
What Is a Bond Beam Block? What Is a Lintel Block? CMU Jamb Block GuideStep 8: Grouting
Many reinforced masonry walls require grout.
Grouting helps:
- Secure reinforcement
- Improve wall strength
- Increase structural stability
Proper grout placement is critical for reinforced walls.
You can also read:
CMU Grouting Methods Guideand use:
CMU Grout CalculatorStep 9: Inspect the Wall
Inspection helps verify:
- Alignment
- Reinforcement placement
- Grout quality
- Structural requirements
Regular inspections improve quality control.
You can also read:
CMU Wall Inspection GuideStep 10: Waterproofing and Finishing
After construction is complete, waterproofing and finishing may be applied.
Common finishing methods include:
- Waterproof coatings
- Sealers
- Paint systems
- Architectural finishes
These treatments improve durability and appearance.
You can also read:
CMU Wall Waterproofing GuideCommon Construction Mistakes
Avoid these common mistakes:
- Poor foundation preparation
- Improper block alignment
- Missing reinforcement
- Incorrect grouting
- Inadequate waterproofing
Proper construction practices help avoid costly repairs.
Advantages of Proper CMU Construction
Improved Structural Strength
Proper installation improves wall performance.
Better Durability
Correct construction extends wall lifespan.
Improved Moisture Resistance
Waterproofing and drainage help protect masonry.
Reduced Maintenance Costs
Quality construction minimizes future repairs.
Better Safety
Properly built walls provide reliable structural support.
Use a CMU Block Calculator
Before starting construction, accurate material estimation is important.
Our CMU Block Calculator helps estimate:
- Block quantities
- Mortar requirements
- Material costs
- Wall dimensions
Related Calculators
- CMU Block Calculator
- CMU Grout Calculator
- Mortar Calculator
- Foundation Calculator
- Rebar Calculator
- Concrete Calculator
Frequently Asked Questions
What is the first step in CMU construction?
Site preparation and foundation construction are typically the first steps.
Do CMU walls require reinforcement?
Many structural masonry walls require reinforcement and grout.
Why is grouting important?
Grouting improves strength, load transfer, and reinforcement bonding.
Do CMU walls need waterproofing?
Yes. Waterproofing helps protect masonry from moisture damage.
Related Articles
- What Is a CMU Block?
- CMU Foundation Wall Guide
- How to Reinforce a CMU Wall
- CMU Rebar Spacing Guide
- CMU Grouting Methods Guide
- What Is a Bond Beam Block?
- What Is a Lintel Block?
- CMU Jamb Block Guide
- CMU Wall Inspection Guide
- CMU Wall Waterproofing Guide
Final Thoughts
The CMU construction process involves careful planning, proper foundation preparation, accurate block installation, reinforcement placement, grouting, inspection, and waterproofing. Following these steps helps create strong, durable, and long-lasting masonry walls for residential and commercial construction projects.