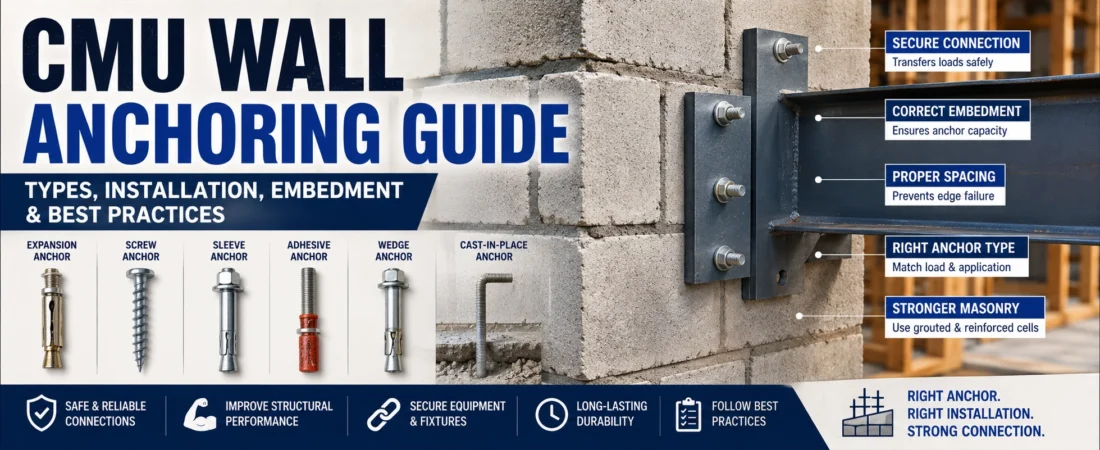
Concrete masonry unit (CMU) walls are commonly used for structural walls, foundations, basements, commercial buildings, garages, retaining walls, and other masonry construction. While CMU blocks provide excellent durability and compressive strength, many building components must be securely connected to the wall to ensure proper structural performance.
This is where CMU wall anchoring becomes important.
Anchors are used to connect masonry walls with other building components such as structural framing, equipment, shelves, doors, windows, roof systems, electrical equipment, mechanical systems, and exterior fixtures. The correct anchor type depends on the wall construction, the load being supported, the location of the connection, and whether the anchor is installed during construction or added afterward.
In this guide, you will learn about common CMU wall anchors, how they work, where they are used, installation methods, embedment considerations, load requirements, and common anchoring mistakes to avoid.
What Is CMU Wall Anchoring?
CMU wall anchoring is the process of securely attaching another building component, structural element, or fixture to a concrete masonry wall using an appropriate anchoring system.
An anchor transfers forces from the attached component into the masonry wall.
Depending on the application, these forces may include:
- Tension
- Shear
- Pull-out forces
- Compression
- Lateral forces
- Combined loads
For example, an anchor may be used to connect:
- Steel framing to a CMU wall
- Wood framing to masonry
- Handrails to concrete blocks
- Shelving to a wall
- Equipment to a masonry wall
- Door frames to CMU
- Window systems to masonry
- Structural brackets to reinforced CMU
The anchoring method should always match the expected load and the condition of the masonry.
Why Is Proper CMU Anchoring Important?
A poorly selected or improperly installed anchor can fail even when the CMU wall itself is structurally sound.
Proper anchoring helps:
- Secure connected components
- Transfer loads safely
- Reduce movement
- Prevent pull-out
- Improve structural stability
- Reduce vibration
- Protect attached equipment
- Improve long-term durability
For structural applications, anchor selection should be based on engineering requirements rather than simply choosing the strongest-looking fastener.
Common Types of CMU Wall Anchors
Several anchoring systems can be used with concrete masonry.
The most common categories include:
- Expansion anchors
- Screw anchors
- Adhesive anchors
- Sleeve anchors
- Wedge-type anchors
- Cast-in-place anchors
- Embedded plates
- Masonry wall ties
- Toggle-style anchors for suitable applications
The appropriate choice depends on whether the CMU is hollow, grouted, reinforced, cracked, uncracked, structural, or non-load-bearing.
1. Expansion Anchors
Expansion anchors work by expanding against the surrounding masonry when the anchor is tightened.
They are commonly used for attaching:
- Brackets
- Shelves
- Light equipment
- Handrails
- Fixtures
- Small structural components
As the anchor is tightened, its expansion mechanism presses against the surrounding material.
The anchor must be installed according to the manufacturer’s requirements for:
- Hole diameter
- Hole depth
- Embedment
- Torque
- Edge distance
- Spacing
Using an anchor outside its approved conditions can significantly reduce its capacity.
2. Concrete and Masonry Screw Anchors
Masonry screws are commonly used for relatively light-duty attachments.
They are installed by drilling an appropriate pilot hole and then driving the screw into the masonry.
Common applications include:
- Electrical fixtures
- Small brackets
- Signs
- Light shelves
- Conduit supports
- Small mechanical components
One advantage is that they can often be installed without a separate expansion sleeve.
However, their capacity depends on the specific product, masonry condition, installation depth, and loading direction.
3. Adhesive Anchors
Adhesive anchors use a chemical bonding material to connect a threaded rod or reinforcing element to a drilled hole.
They can be useful when higher-strength connections are required, provided the system is specifically approved for the masonry application.
A typical installation involves:
- Drilling the hole
- Cleaning the hole
- Preparing the adhesive
- Filling the hole according to the manufacturer’s instructions
- Installing the threaded rod
- Allowing the adhesive to cure
- Applying the load after the required curing period
Hole cleaning is extremely important.
Dust or debris left inside the hole can reduce bond performance.
4. Sleeve Anchors
Sleeve anchors contain an expansion sleeve that expands against the inside of the drilled hole as the anchor is tightened.
They are frequently used for attaching:
- Metal brackets
- Equipment
- Frames
- Rails
- Structural accessories
- Medium-duty fixtures
The actual capacity depends on the anchor design and the masonry substrate.
Before installation, verify that the selected anchor is suitable for the specific CMU condition.
5. Cast-In-Place Anchors
Cast-in-place anchors are installed during construction rather than drilled into an existing wall.
They may include:
- Anchor bolts
- Embedded plates
- Threaded rods
- Steel connectors
- Special masonry inserts
One advantage is that the anchor can be integrated into the wall while the masonry or grout is being constructed.
This approach is commonly considered when the connection is part of the original structural design.
6. Embedded Plates
Embedded steel plates can provide strong connection points when properly designed and installed.
An embedded plate may be connected to:
- Reinforcing steel
- Anchor rods
- Structural framing
- Steel brackets
- Equipment supports
Because embedded plates can transfer significant forces, their design should be coordinated with the overall structural system.
They should not simply be added to a CMU wall without considering reinforcement, grout, load path, and edge conditions.
CMU Anchoring to Hollow vs Grouted Cells
One of the most important factors in CMU anchoring is whether the anchor is being installed into:
- Hollow CMU
- Partially grouted CMU
- Fully grouted CMU
These conditions can have very different anchoring capacities.
A hollow block does not provide the same substrate as a fully grouted cell.
When a structural connection is required, the anchor location may need to be coordinated with reinforced and grouted cells.
This is one reason why anchoring should be considered during the wall design rather than added randomly after construction.
Anchoring Into the Face Shell vs Web
CMU blocks contain different structural portions, including:
- Face shells
- Webs
- Cores
An anchor installed into a thin face shell may behave very differently from one installed into a fully grouted cell.
Therefore, the location of the anchor matters.
Before drilling, determine:
- Where the CMU cores are located
- Whether the cell is grouted
- Where reinforcement is installed
- Whether the anchor could damage reinforcement
- How much masonry surrounds the anchor
Blindly drilling into a reinforced masonry wall can damage reinforcement or create an unsuitable connection.
CMU Anchor Embedment
Embedment depth is the distance that the anchor extends into the masonry substrate.
Adequate embedment is essential because the anchor needs sufficient contact with the surrounding material to develop its intended capacity.
However, deeper does not automatically mean stronger.
The maximum useful embedment can be limited by:
- CMU geometry
- Wall thickness
- Reinforcement
- Edge distance
- Anchor design
- Manufacturer requirements
- Grout location
Always follow the approved installation requirements for the selected anchoring system.
Edge Distance for CMU Anchors
Anchors installed too close to an edge can have reduced capacity.
This is because the surrounding masonry provides less material to resist the forces generated by the anchor.
Edge conditions can occur near:
- Wall corners
- Openings
- Door frames
- Window frames
- Wall ends
- Top of walls
- Control joints
For this reason, anchor placement should consider both the anchor’s required edge distance and the geometry of the CMU wall.
Anchor Spacing
When multiple anchors are used, their spacing also matters.
Anchors installed too close together can interact with each other and reduce the effective capacity of the connection.
Spacing should be determined according to:
- Anchor type
- Load requirements
- Masonry condition
- Anchor diameter
- Embedment
- Edge distance
- Manufacturer specifications
For structural connections, spacing should be established as part of the engineered connection rather than estimated visually.
CMU Wall Anchoring for Structural Connections
Structural anchoring may be required when connecting masonry walls to:
- Steel beams
- Steel columns
- Roof structures
- Floor systems
- Wood framing
- Structural brackets
- Equipment supports
These connections can experience significant forces.
A structural connection should therefore have a clearly defined load path:
Attached component → Anchor → CMU/grout/reinforcement → Wall → Foundation
If any part of this load path is inadequate, the connection may fail even if the anchor itself has a high rated capacity.
CMU Wall Anchoring and Reinforcement
Anchoring and wall reinforcement are closely related, but they are not the same thing.
Reinforcement strengthens the masonry wall itself.
Anchoring connects another component to that wall.
In some structural applications, the anchor may need to connect to or work with reinforced and grouted portions of the wall.
see our How to Reinforce a CMU Wall explains reinforced masonry systems in greater detail. For reinforcement spacing, see the CMU Rebar Spacing Guide.CMU Wall Anchoring Near Rebar
Before drilling into a reinforced CMU wall, the location of reinforcing steel should be considered.
Drilling into reinforcement can:
- Damage the structural reinforcement
- Reduce the capacity of the wall
- Damage drilling equipment
- Create installation problems
- Change the intended load path
For important structural connections, reinforcement locations should be identified before drilling.
CMU Anchoring Near Wall Openings
Extra care is required when installing anchors near:
- Doors
- Windows
- Lintels
- Jambs
- Wall ends
These areas may contain additional reinforcement or specialized CMU components.
For example, your existing <a href=”https://cmublockcalculator.com/cmu-jamb-block-guide/”>CMU Jamb Block Guide</a> covers specialized masonry around door and window openings.
Anchor placement should therefore be coordinated with the existing wall details rather than treating the entire wall as identical.
Common CMU Anchoring Mistakes
Some of the most common anchoring mistakes include:
- Choosing an anchor without checking its application
- Using an anchor designed for concrete in an unsuitable CMU condition
- Installing too close to an edge
- Using insufficient embedment
- Drilling into reinforcement
- Ignoring hollow vs grouted cells
- Failing to clean drilled holes
- Over-tightening expansion anchors
- Under-tightening anchors
- Loading the connection before adhesive has cured
- Installing anchors too close together
- Using damaged or corroded anchors
These mistakes can significantly reduce the performance of an otherwise good connection.
CMU Wall Anchor Installation Process
Once the correct anchor has been selected, proper installation is just as important as anchor strength. A high-capacity anchor can still perform poorly if the hole is drilled incorrectly, the substrate is damaged, or the anchor is installed without following the manufacturer’s requirements.
A typical installation process includes:
- Identify the anchor location.
- Confirm the CMU condition.
- Check for reinforcement and embedded components.
- Mark the drilling location.
- Drill the required hole.
- Clean the hole when required.
- Install the anchor.
- Tighten or cure the anchor according to its installation requirements.
- Attach the connected component.
- Inspect the completed connection.
The exact procedure varies considerably between mechanical and adhesive anchors, so the manufacturer’s installation instructions should always take priority.
How to Drill Into a CMU Wall
Drilling into CMU requires more care than simply selecting a drill bit and making a hole.
Before drilling, determine:
- Block thickness
- Hollow or grouted condition
- Anchor type
- Required hole diameter
- Required hole depth
- Nearby reinforcement
- Edge distance
- Anchor spacing
Use a drill bit specifically intended for masonry and the drilling method recommended for the selected anchor.
Avoid creating unnecessarily large holes because oversized holes can reduce anchor performance.
Cleaning the Anchor Hole
Hole cleaning is particularly important for adhesive anchoring systems.
Dust and loose material can interfere with bonding between the adhesive and the masonry.
Depending on the anchor system, cleaning may involve:
- Brushing
- Blowing
- Vacuuming
- Repeated cleaning cycles
Always follow the specific anchor manufacturer’s cleaning procedure because adhesive systems can have different requirements.
Installing Mechanical Anchors
Mechanical anchors generally require the anchor to be inserted into a properly sized hole and then tightened or activated.
The installation process may involve:
- Drilling the specified hole.
- Removing loose dust and debris.
- Inserting the anchor.
- Setting the expansion mechanism.
- Tightening to the specified torque.
- Attaching the supported component.
- Inspecting the connection.
Over-tightening can damage the masonry or anchor, while insufficient tightening can prevent the anchor from developing its intended capacity.
Installing Adhesive Anchors
Adhesive anchors require a more controlled installation process.
A typical process is:
- Drill the hole to the specified diameter and depth.
- Clean the hole thoroughly.
- Prepare the adhesive cartridge.
- Dispense the required amount of adhesive.
- Insert the threaded rod using the specified method.
- Allow the adhesive to cure.
- Install the connected component.
- Apply the load only after the required curing period.
Temperature can affect adhesive curing time, so installation requirements should always be checked before loading the connection.
Tension Loads vs Shear Loads
Understanding the direction of the load is important when selecting a CMU anchor.
Tension Load
A tension load attempts to pull the anchor away from the wall.
Examples include:
- Equipment brackets
- Suspended components
- Structural connections
- Exterior fixtures exposed to wind
Shear Load
A shear load acts sideways across the anchor.
Examples include:
- Shelving
- Brackets
- Handrails
- Equipment supports
Some connections experience both tension and shear simultaneously.
For structural connections, the combined loading condition should be considered rather than evaluating only one direction.
Anchoring Heavy Equipment to CMU Walls
Heavy equipment requires significantly more consideration than ordinary wall fixtures.
Examples include:
- Mechanical equipment
- Electrical equipment
- Industrial machinery
- Pumps
- Storage systems
- Large brackets
Before installing heavy equipment, consider:
- Equipment weight
- Operating vibration
- Dynamic loads
- Anchor capacity
- Masonry condition
- Grouted cells
- Reinforcement
- Edge distance
- Number of anchors
- Load distribution
The supporting CMU wall and its foundation should also be capable of resisting the additional loads.
CMU Anchoring for Handrails and Guardrails
Handrails and guardrails can place significant loads on their anchors because people may push, pull, or lean against them.
Anchor locations should therefore be selected carefully.
Important considerations include:
- Anchor spacing
- Edge distance
- Masonry condition
- Rail height
- Connection configuration
- Expected loading
For safety-critical installations, the connection should be designed and verified according to applicable building and safety requirements.
Anchoring Doors and Window Frames to CMU
Doors and windows often require secure connections between the frame and masonry.
Anchors may be installed around:
- Jambs
- Heads
- Sills
- Frame brackets
The connection should account for the specific frame system and the condition of the surrounding CMU.
Specialized masonry units such as jamb blocks may also be used around openings.
See our <a href=”https://cmublockcalculator.com/cmu-jamb-block-guide/”>CMU Jamb Block Guide</a> for more information.
Anchoring Roof and Floor Connections
CMU walls may connect to roof and floor systems through:
- Anchor bolts
- Embedded plates
- Steel connectors
- Structural brackets
- Bond beams
- Reinforced masonry connections
These are generally structural connections rather than simple fixture attachments.
The connection must provide a reliable load path between the wall and the connected structural system.
Our CMU Structural Wall Guide covers structural wall design and load-bearing considerations in greater detail.Exterior CMU Wall Anchors
Exterior anchors are exposed to environmental conditions that can accelerate corrosion.
Exterior applications may include:
- Signs
- Lighting
- Railings
- Equipment
- Canopies
- Brackets
- Architectural features
For exterior applications, anchor material and corrosion resistance should be appropriate for the exposure environment.
Corrosion Protection for CMU Anchors
Anchor corrosion can weaken a connection over time.
Corrosion risk increases in environments exposed to:
- Rain
- Snow
- Salt
- Coastal air
- Industrial chemicals
- High humidity
Depending on the application, corrosion-resistant materials or protective finishes may be appropriate.
The anchor manufacturer’s recommendations should be followed when selecting materials for exterior or aggressive environments.
CMU Anchor Inspection
Anchored connections should be inspected periodically when they are important to safety or equipment operation.
Look for:
- Loose anchors
- Rust
- Cracked masonry
- Pull-out
- Wall movement
- Damaged brackets
- Deformed hardware
- Water-related deterioration
If an anchor appears loose or the surrounding masonry is damaged, simply tightening the fastener may not solve the problem.
The underlying cause should be investigated.
CMU Anchor Testing
For important structural connections, testing may be appropriate to verify installation quality and connection performance.
Testing may be considered for:
- Structural anchors
- Heavy equipment
- Safety-critical connections
- High-load applications
- Projects requiring documented installation quality
The type and extent of testing depend on the anchor system, project requirements, and applicable specifications.
What to Do if a CMU Anchor Pulls Out
An anchor that pulls out should not simply be reinstalled in the same damaged hole.
First determine why the failure occurred.
Possible causes include:
- Insufficient embedment
- Incorrect anchor type
- Oversized hole
- Poor hole cleaning
- Damaged masonry
- Excessive load
- Insufficient edge distance
- Improper installation
- Deteriorated substrate
The failed connection should be evaluated before selecting a replacement anchor or location.
CMU Anchor Troubleshooting
| Problem | Possible Cause | General Solution |
|---|---|---|
| Anchor spins during installation | Improper setting or damaged substrate | Inspect anchor and hole |
| Anchor pulls out | Insufficient capacity or poor installation | Reevaluate connection |
| Masonry cracks | Excessive expansion or poor location | Review anchor type and placement |
| Adhesive does not cure | Incorrect conditions or installation | Follow manufacturer’s curing requirements |
| Anchor becomes loose | Vibration or inadequate installation | Inspect and correct connection |
| Corrosion appears | Unsuitable material or exposure | Use appropriate corrosion-resistant system |
| Bracket moves | Connection or substrate problem | Inspect entire assembly |
Common CMU Wall Anchoring Mistakes
Avoid these common mistakes:
- Using a random anchor without checking its rating
- Assuming all CMU provides the same anchoring capacity
- Ignoring whether the cell is hollow or grouted
- Installing too close to an edge
- Using insufficient embedment
- Drilling into reinforcement
- Failing to clean adhesive anchor holes
- Over-tightening mechanical anchors
- Loading adhesive anchors before curing
- Ignoring corrosion exposure
- Using damaged masonry as the anchor substrate
- Adding heavy equipment without checking wall capacity
CMU Wall Anchoring Best Practices Checklist
Before completing an anchoring project, verify:
✔ Correct anchor type selected
✔ CMU condition identified
✔ Hollow or grouted condition confirmed
✔ Anchor diameter verified
✔ Required embedment confirmed
✔ Edge distance checked
✔ Anchor spacing checked
✔ Reinforcement locations considered
✔ Hole drilled to the correct size
✔ Hole cleaned when required
✔ Anchor installed according to manufacturer instructions
✔ Required torque applied where applicable
✔ Adhesive allowed to cure where applicable
✔ Connection inspected after installation
✔ Corrosion protection considered for exterior applications
Frequently Asked Questions
Can you anchor directly into a CMU block?
Yes, anchors can be installed into CMU, but the appropriate anchor depends on the block configuration, masonry condition, load, and connection requirements.
Are CMU anchors stronger in grouted cells?
A grouted and reinforced cell can provide a different and potentially stronger substrate than a hollow portion of a block, but the actual capacity depends on the complete connection design and approved anchor system.
Can I use concrete anchors in CMU?
Not automatically. An anchor designed for concrete should only be used in CMU when the manufacturer specifically approves it for that masonry application.
How deep should an anchor go into a CMU wall?
There is no single embedment depth that applies to every CMU anchor. Required embedment depends on the anchor type, masonry condition, load, wall geometry, and manufacturer’s requirements.
Can anchors be installed near the edge of a CMU wall?
They can be, but edge distance requirements must be considered. Anchors installed too close to edges may have reduced capacity or cause masonry damage.
Can I drill through CMU reinforcement?
Drilling through structural reinforcement should be avoided unless the connection has been specifically designed and approved to accommodate it. Reinforcement can be an important part of the wall’s structural load path.
Final Thoughts
CMU wall anchoring is an important part of masonry construction because anchors provide the connection between concrete masonry and many other building components.
The best anchor is not simply the one with the highest advertised strength. The correct system depends on the CMU condition, load direction, embedment, edge distance, spacing, reinforcement, exposure, and installation method.
For light-duty applications, masonry screws or suitable mechanical anchors may be sufficient. Heavier structural connections may require engineered anchor systems, embedded plates, reinforced cells, or other specialized connections.
Proper installation is equally important. Correct drilling, hole cleaning, anchor setting, adhesive curing, torque, and inspection can make a significant difference in connection performance.
For structural or safety-critical applications, the anchoring system should be selected and verified by a qualified design professional according to applicable project requirements.
Related Calculators
- CMU Block Calculator
- Rebar Calculator
- Concrete Calculator
- Mortar Calculator
- Gravel Calculator
- Foundation Calculator