
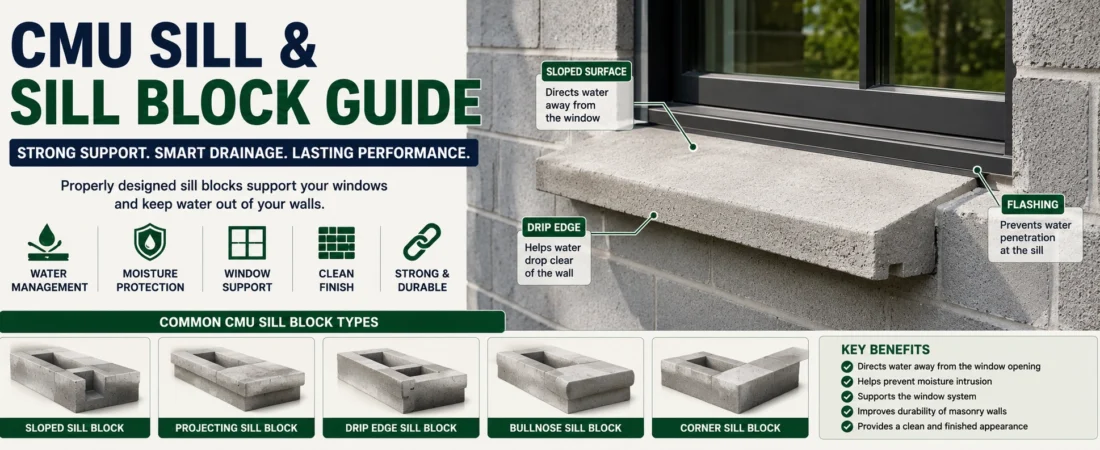
CMU walls often include openings for windows and other exterior or interior applications. The area directly below a window opening requires careful planning because it must support the window, manage water, and connect properly with the surrounding masonry.
A CMU sill is the horizontal surface or masonry component located at the bottom of a window opening.
A sill block is a specialized concrete masonry unit designed for applications such as window sills, wall openings, and other locations where a specific sill profile or configuration is needed.
A properly designed CMU sill can help with:
- Window support
- Water drainage
- Masonry alignment
- Moisture control
- Finished appearance
- Coordination with surrounding CMU
What Is a CMU Sill?
A CMU sill is the bottom portion of a masonry window opening.
The sill creates the transition between the masonry wall and the window assembly.
Depending on the design, a CMU sill may include:
- Sill blocks
- Sloped surfaces
- Flashing
- Sealant
- Reinforcement
- Grout
- Window frame
- End conditions
The exact configuration depends on the wall design and the type of window being installed.
What Is a Sill Block?
A sill block is a concrete masonry unit specifically shaped or configured for use at a sill or similar masonry detail.
Unlike a standard CMU, a sill block may have a profile that helps create:
- A sloped surface
- A finished edge
- A defined drainage path
- A cleaner transition around the window opening
Sill blocks can be useful where the appearance and water management of the window sill are important.
Where Are CMU Sill Blocks Used?
CMU sill blocks are commonly associated with:
- Window openings
- Exterior masonry walls
- Residential buildings
- Commercial buildings
- Architectural masonry
- Concrete block construction
They may be used with different types of CMU walls depending on the window system and masonry design.
The sill must be coordinated with the overall opening dimensions rather than installed independently.
For information about the masonry components used around window openings, see the CMU Jamb Block Guide.
CMU Sill vs Sill Block
The terms CMU sill and sill block are related but do not necessarily mean exactly the same thing.
| Feature | CMU Sill | Sill Block |
|---|---|---|
| Meaning | The sill area or assembly below a window | Specialized CMU used to form a sill |
| Function | Supports and finishes the bottom of opening | Helps create the sill profile |
| Water management | Important | Can incorporate drainage/slope features |
| Appearance | Depends on design | Often provides a finished profile |
| Application | Window openings | Window openings and specialized masonry details |
In simple terms:
CMU sill = the sill area or assembly
Sill block = the masonry unit used to create or form the sill
Why Is a CMU Window Sill Important?
The sill is exposed to water and weather, particularly on exterior walls.
Rainwater can collect around the lower portion of a window if the sill and surrounding details are not properly designed.
A properly detailed sill can help:
- Direct water away from the window
- Reduce water penetration
- Protect the masonry below
- Support the window assembly
- Create a finished appearance
- Coordinate with flashing
Water management is especially important where the window is installed in an exterior CMU wall.
CMU Sill Slope
A sill may be designed with a sloped surface to help move water away from the window opening.
A sloped sill can help prevent water from remaining directly below the window.
The slope should direct water:
Away from the window → Toward the exterior → Away from the masonry face
Important considerations include:
- Sill slope
- Overhang
- Drip edge
- Flashing
- Sealant
- Window frame position
The exact slope and profile should follow the window and masonry design.
CMU Sill Overhang
A sill may extend beyond the face of the masonry wall.
This overhang can help move water away from the wall surface.
An effective sill overhang can help reduce:
- Water running down the wall
- Staining
- Moisture exposure
- Efflorescence
- Deterioration around the opening
The amount of projection depends on the sill design and wall configuration.
CMU Sill Drip Edge
A drip edge or drip feature can help separate flowing water from the masonry wall face.
As water reaches the edge of the sill, the drip detail encourages it to fall away instead of flowing backward toward the wall.
A properly positioned drip detail can help reduce:
- Water staining
- Moisture penetration
- Saturation of the masonry
- Damage around the window opening
The drip location should be coordinated with the sill projection and window position.
CMU Sill Flashing
Flashing is an important part of window-opening moisture management.
At an exterior window opening, flashing can help direct water toward the exterior rather than allowing it to enter the wall assembly.
The sill area may need to coordinate with:
- Sill flashing
- Window frame
- Jambs
- Lintel
- Sealant
- Weep provisions
- Masonry units
Flashing should be installed and integrated according to the overall wall and window design.
CMU Sill and Window Installation
The sill should be planned before the window is installed.
Important dimensions include:
- Window width
- Window height
- Rough opening
- Sill height
- Jamb width
- Lintel location
- Sill block dimensions
- Masonry joint dimensions
Poor coordination can result in:
- Incorrect opening dimensions
- Excessive block cutting
- Poor window fit
- Uneven sill appearance
- Water-management problems
The masonry layout should therefore be coordinated with the window manufacturer’s dimensions before construction begins.
CMU Sill and Jambs
The sill does not work independently.
The window opening normally includes three major areas:
- Sill — bottom of the opening
- Jambs — vertical sides
- Lintel — structural element above the opening
These components need to work together.
The jambs provide the vertical sides of the opening, while the sill forms the bottom transition and the lintel supports masonry above the opening.
For more information about the vertical sides of CMU window and door openings, see the CMU Jamb Block Guide.
CMU Sill and Lintel Coordination
The sill and lintel are located at opposite ends of the window opening, but both need to be considered during the initial masonry layout.
The layout should account for:
- Opening width
- Opening height
- Block courses
- Sill elevation
- Lintel elevation
- Reinforcement
- Grouted cells
- Window dimensions
Planning these dimensions before construction can reduce unnecessary cutting and adjustments.
CMU Sill Block Dimensions
Sill block dimensions depend on the specific manufacturer and product design.
Important dimensions may include:
- Length
- Width
- Height
- Sill profile
- Projection
- Sloped surface
- Drip detail
The sill block should be compatible with the wall thickness and surrounding CMU units.
For common CMU dimensions and nominal versus actual sizes, see the CMU Block Sizes Chart and CMU Nominal vs Actual Dimensions.
CMU Sill for 8-Inch Walls
8-inch CMU walls are widely used in residential and commercial masonry construction.
When installing a sill in an 8-inch CMU wall, the sill assembly should be coordinated with:
- Actual wall dimensions
- Sill block profile
- Window frame
- Flashing
- Overhang
- Drip detail
- Masonry joints
The nominal wall thickness should not be confused with the actual dimensions of the masonry unit.
Common CMU Sill Problems
Poorly designed or installed sills can create several problems.
Common issues include:
1. Incorrect Slope
A sill that does not drain properly may allow water to collect.
2. Insufficient Projection
A sill with inadequate projection may allow water to run down the masonry face.
3. Missing Drip Detail
Without a proper drip feature, water may remain attached to the wall surface.
4. Poor Flashing
Improper flashing can allow water to enter the wall assembly.
5. Incorrect Window Dimensions
A mismatch between the masonry opening and window size can create installation problems.
6. Poor Joint Alignment
Incorrect block layout can create an uneven or unattractive sill.
7. Excessive Cutting
Poor planning can result in unnecessary cutting of standard CMU units.
CMU Sill Planning Checklist
Before constructing a CMU window opening, check:
☑ Window dimensions verified
☑ Rough opening dimensions verified
☑ Wall thickness confirmed
☑ Sill elevation established
☑ Sill block selected
☑ Sill slope considered
☑ Sill projection checked
☑ Drip detail planned
☑ Flashing coordinated
☑ Jamb dimensions checked
☑ Lintel location coordinated
☑ Reinforcement locations reviewed
☑ Grout locations reviewed
☑ Masonry layout completed
Proper planning can reduce cutting, improve alignment, and help prevent moisture-related problems around the window opening.
Types of CMU Sill Blocks
CMU sill blocks can be available in different shapes and profiles depending on the masonry system and window design.
Common configurations may include:
- Sloped sill blocks
- Projecting sill blocks
- Drip-edge sill blocks
- Bullnose-style sill units
- Special architectural sill units
- Matching corner sill units
The correct sill block should be compatible with:
- Wall thickness
- Window dimensions
- Masonry layout
- Sill projection
- Drainage requirements
- Exterior finish
Sloped vs Flat CMU Sills
CMU window sills can be designed with either a sloped or relatively flat surface.
| Feature | Sloped CMU Sill | Flat CMU Sill |
|---|---|---|
| Water drainage | Better | Requires careful detailing |
| Standing water | Reduced | Potentially higher |
| Exterior use | Common consideration | Depends on design |
| Appearance | Angled profile | Simple profile |
| Water management | Easier to direct outward | Requires additional detailing |
A sloped sill is generally useful for exterior openings because it helps direct water toward the outside of the wall.
CMU Sill Flashing
Flashing is an important component of a properly detailed window opening.
Sill flashing can help direct water toward the exterior instead of allowing it to enter the wall assembly.
The sill flashing should be coordinated with:
- Window frame
- Sill block
- Jambs
- Lintel
- Sealant
- Masonry joints
- Drainage provisions
Flashing should not be treated as a replacement for proper sill slope or drainage. The entire window opening should be designed as a coordinated system.
CMU Sill Overhang and Drip Detail
A sill can project beyond the face of the masonry wall.
This projection helps create a path for water to move away from the wall.
A drip detail can further improve water separation by encouraging water to fall away from the masonry face.
A properly designed sill may therefore include:
- Slope
- Projection
- Drip edge
- Drip groove
- Flashing
The exact configuration depends on the sill product and wall design.
CMU Sill Blocks Around Different Window Sizes
Window size can affect the masonry layout and sill arrangement.
Small windows may require a relatively simple sill configuration, while larger openings may require additional planning for:
- Sill dimensions
- Jambs
- Lintels
- Reinforcement
- Grout
- Flashing
- Special masonry units
The window opening should be included in the initial CMU layout rather than modifying the wall after construction has started.
CMU Sill Installation
Before installing the sill, verify the masonry opening and window dimensions.
A basic installation sequence may include:
Step 1: Verify the Opening
Check:
- Opening width
- Opening height
- Wall thickness
- Sill elevation
- Jamb locations
Step 2: Prepare the Masonry
Make sure the supporting masonry surface is properly aligned and ready for the sill installation.
Step 3: Install Required Flashing
Install and coordinate flashing according to the wall and window design.
Step 4: Place the Sill Units
Position the sill blocks according to the planned masonry layout.
Step 5: Check Slope
Verify that the sill surface directs water toward the exterior.
Step 6: Check Projection
Make sure the sill provides the intended projection and drip detail.
Step 7: Complete Joints
Properly form and finish the mortar joints between sill units.
Step 8: Coordinate the Window
The finished sill should be compatible with the window frame and surrounding masonry.
CMU Sill Mortar Joints
Mortar joints between sill units should be consistent with the surrounding masonry construction.
Important considerations include:
- Joint thickness
- Mortar coverage
- Alignment
- Tooling
- Joint appearance
- Compatibility with movement
Poorly formed joints can create both appearance and moisture-management problems.
For additional information about mortar quantities for masonry projects, you can use the:
Mortar CalculatorCMU Sill and Reinforcement
Some CMU window openings may require reinforcement depending on the wall design.
Reinforcement can be coordinated with:
- Jambs
- Sill areas
- Lintels
- Grouted cells
- Bond beams
The exact reinforcement arrangement depends on the structural design.
Reinforcement should be planned before the masonry is installed so that the block layout does not interfere with the required reinforcement locations.
For related information, see:
How to Reinforce a CMU WallCMU Sill Around Corners
Corners require additional planning when a window is located near the end of a wall.
The layout may need to coordinate:
- Corner units
- Sill units
- Half blocks
- Jambs
- Reinforcement
- Window dimensions
Poor planning can result in excessive cutting or an uneven sill appearance.
The corner should therefore be included in the masonry layout before installation begins.
CMU Sill Block Cutting
Sill blocks should ideally be planned around the window dimensions so that unnecessary cutting is minimized.
Excessive cutting can lead to:
- Material waste
- Uneven appearance
- Weak or damaged units
- Difficult installation
- More labor
Using appropriately sized or specially manufactured units can sometimes provide a cleaner result than cutting multiple standard blocks.
Common CMU Sill Installation Mistakes
1. Incorrect Sill Slope
A sill that does not drain toward the exterior can allow water to collect.
2. Insufficient Projection
A sill with inadequate projection may allow water to run directly down the wall.
3. Missing Drip Detail
Without a proper drip feature, water can remain attached to the masonry surface.
4. Poor Flashing
Incorrectly installed flashing can create moisture problems around the window.
5. Incorrect Window Opening
The masonry opening must match the required window dimensions.
6. Poor Jamb Coordination
The sill, jambs, and lintel should be planned as one opening.
7. Excessive Block Cutting
Poor layout can create unnecessary cuts and material waste.
8. Ignoring Reinforcement
Where reinforcement is required, the sill and surrounding masonry must be coordinated with the structural design.
CMU Sill Maintenance
Exterior CMU sills should be inspected periodically.
Look for:
- Cracked sill units
- Damaged mortar joints
- Water staining
- Efflorescence
- Cracked sealant
- Damaged flashing
- Block deterioration
- Water accumulation
Problems should be investigated early so that moisture does not cause additional damage to the surrounding masonry.
For information about moisture absorption in concrete masonry, see:
CMU Block Absorption & Water Absorption GuideCMU Sill Repair
The appropriate repair depends on the cause and severity of the problem.
Possible repairs include:
- Repointing mortar joints
- Replacing damaged sill units
- Replacing damaged sealant
- Repairing flashing
- Correcting drainage
- Replacing cracked units
- Repairing surrounding masonry
If water continues to enter after repairing the visible sill, the complete window-opening drainage system should be inspected.
CMU Sill Installation Checklist
Before completing a CMU window sill, check:
☑ Window dimensions verified
☑ Rough opening dimensions verified
☑ Wall thickness confirmed
☑ Sill elevation established
☑ Sill block selected
☑ Sill slope checked
☑ Sill projection checked
☑ Drip detail planned
☑ Flashing coordinated
☑ Jamb dimensions checked
☑ Lintel location coordinated
☑ Reinforcement locations reviewed
☑ Grout locations reviewed
☑ Mortar joints checked
☑ Window installation coordinated
CMU Sill Material Estimation
When planning a CMU window opening, material quantities may include:
- Standard CMU blocks
- Sill blocks
- Half blocks
- Corner units
- Mortar
- Grout
- Reinforcement
- Flashing
- Sealant
The exact quantity depends on the wall dimensions and number and size of openings.
Related CMU Guides
- CMU Jamb Block Guide
- CMU Block Sizes Chart
- CMU Nominal vs Actual Dimensions
- CMU Wall Thickness Guide
- CMU Structural Wall Guide
- How to Reinforce a CMU Wall
- CMU Block Absorption & Water Absorption Guide
Related Calculators
- CMU Block Calculator
- Mortar Calculator
- Concrete Calculator
- Foundation Calculator
- Rebar Calculator
- Gravel Calculator
Frequently Asked Questions
What is a CMU sill?
A CMU sill is the horizontal bottom portion of a masonry window opening that helps support and transition the window assembly while managing water drainage.
What is a sill block?
A sill block is a specialized concrete masonry unit designed to form a sill or provide a particular profile at the bottom of an opening.
Should a CMU window sill be sloped?
A sloped exterior sill can help direct water away from the window and masonry wall.
What is the purpose of a sill drip edge?
A drip edge helps separate water from the masonry face and encourages it to fall away from the wall.
Does a CMU sill need flashing?
Exterior window openings commonly require coordinated flashing and drainage details. The exact requirements depend on the wall and window system.
Can standard CMU be used for a window sill?
Standard CMU can be used in some masonry layouts, but specialized sill units may provide a better profile, drainage detail, or finished appearance.
Does sill block size depend on the wall thickness?
Yes. The sill block should be compatible with the wall thickness and surrounding masonry units.
How do you prevent water problems around a CMU window sill?
Proper slope, projection, drip details, flashing, sealant, and coordinated window installation can all contribute to effective water management.
Final Thoughts
CMU sills and sill blocks are important components of masonry window openings.
A properly planned sill should coordinate:
- Sill block dimensions
- Window dimensions
- Wall thickness
- Sill slope
- Projection
- Drip detail
- Flashing
- Jambs
- Lintel
- Reinforcement
- Mortar joints
Planning the entire window opening before construction can reduce unnecessary cutting, improve masonry alignment, and help control water around the opening.
A well-designed CMU sill provides both functional water management and a clean finished appearance.