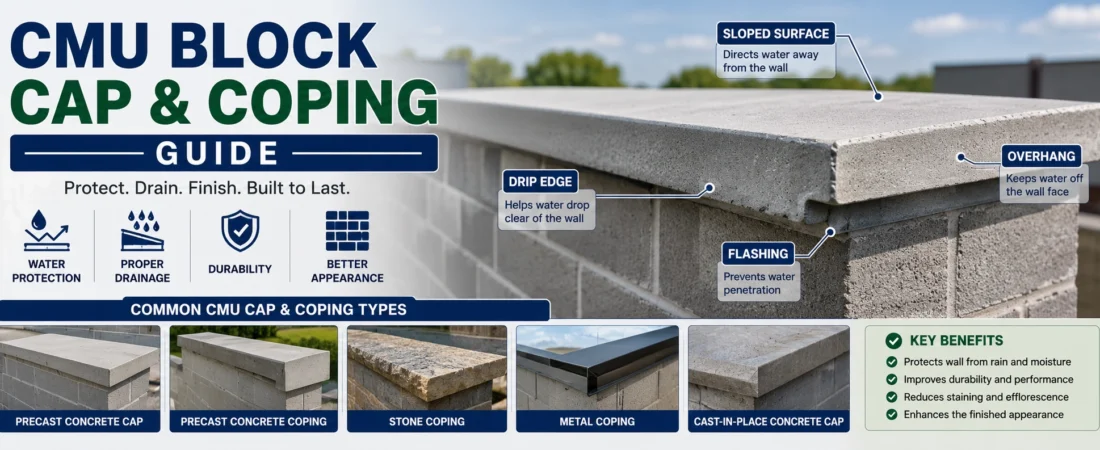
Concrete masonry walls are exposed to rain, snow, moisture, and changing weather conditions. The top of a CMU wall is particularly important because water can enter from above if the wall is not properly protected.
CMU caps and coping are used to protect the top of masonry walls and help direct water away from the wall surface.
A properly designed wall cap or coping system can help:
- Reduce water penetration
- Protect the top of the masonry wall
- Improve drainage
- Protect mortar joints
- Reduce moisture-related problems
- Improve the finished appearance of the wall
What Is a CMU Wall Cap?
A CMU wall cap is a unit or assembly installed at the top of a concrete masonry wall.
The primary purpose of a cap is to protect the exposed top of the wall from water and weather.
Depending on the wall design, caps may be made from:
- Concrete masonry units
- Precast concrete
- Cast-in-place concrete
- Stone
- Metal
- Other compatible materials
CMU wall caps are commonly used on:
- Free-standing walls
- Garden walls
- Privacy walls
- Screen walls
- Retaining walls
- Parapets
- Architectural masonry walls
The cap should be designed to work with the wall, drainage system, movement joints, and other building components.
What Is CMU Coping?
Coping is the protective covering or top treatment installed over the top of a masonry wall, particularly where protection from weather and water is important.
Coping can be made from materials such as:
- Precast concrete
- Stone
- Metal
- Concrete
- Other compatible materials
Coping is commonly found on:
- Parapet walls
- Exterior masonry walls
- Roof-level walls
- Boundary walls
- Architectural masonry
The coping should be designed to shed water away from the wall rather than allowing water to remain on the top surface.
CMU Cap vs Coping
The terms cap and coping are sometimes used interchangeably, but they can have slightly different meanings depending on the project and construction terminology.
A simple distinction is:
| Feature | CMU Cap | Coping |
|---|---|---|
| Main purpose | Protect wall top | Protect and shed water from wall top |
| Common location | Walls and free-standing masonry | Parapets and exposed wall tops |
| Materials | CMU, concrete, precast, etc. | Concrete, stone, metal, precast, etc. |
| Water management | Important | Critical |
| Appearance | Functional or architectural | Functional or architectural |
In practice, the exact terminology can vary between designers, contractors, manufacturers, and project specifications.
Why Are CMU Caps and Coping Important?
The top of a masonry wall is vulnerable to direct water exposure.
Without proper protection, water can enter through:
- Open cores
- Cracks
- Mortar joints
- Interfaces between materials
- Flashing penetrations
- Poorly sealed joints
Moisture can contribute to problems such as:
- Efflorescence
- Staining
- Mortar deterioration
- Cracking
- Freeze-thaw damage
- Interior water penetration
Proper wall-top detailing is therefore an important part of protecting a masonry wall from moisture.
For more information about moisture-related properties of concrete masonry units, see the CMU Block Absorption & Water Absorption Guide.
CMU Wall Cap Design
A wall cap should not simply be placed flat on top of the masonry without considering water drainage.
Important design considerations include:
- Cap width
- Wall thickness
- Overhang
- Slope
- Drip edge or drip reveal
- Flashing
- Sealant
- Movement joints
- Anchorage
- Material compatibility
The cap should help direct water away from the masonry wall.
A properly designed cap can also provide a finished appearance while protecting the top of the wall.
The required cap width should be coordinated with the actual wall thickness. For standard CMU wall dimensions, see the CMU Wall Thickness Guide.
CMU Cap Overhang
One important feature of many wall-cap systems is the overhang.
The cap can extend beyond the face of the wall so that water is discharged away from the masonry surface.
A properly designed overhang can help prevent water from flowing directly down the face of the wall.
The amount of overhang depends on:
- Wall thickness
- Cap material
- Cap design
- Drip detail
- Exposure
- Project requirements
Both sides of a freestanding wall may require appropriate overhang where water needs to be directed away from the masonry.
CMU Coping Slope
Coping should generally be designed with a slope so that water does not remain on the top surface.
A sloped coping surface helps:
- Move rainwater away
- Reduce standing water
- Protect masonry below
- Improve drainage
- Reduce moisture exposure
Flat surfaces can allow water to collect when drainage is inadequate.
The appropriate slope depends on the coping material, wall design, climate, and project requirements.
Drip Edge and Drip Reveal
A drip edge or drip reveal helps interrupt water flow and encourages water to fall away from the wall rather than running back toward the masonry face.
This detail is especially useful where the cap or coping projects beyond the wall.
A properly positioned drip detail can help reduce:
- Water staining
- Saturation of the wall face
- Moisture exposure
- Efflorescence-related appearance problems
- Deterioration of masonry surfaces
The drip detail should be positioned so that water is released away from the wall face.
CMU Cap Flashing
Flashing is an important part of wall-top moisture management.
At parapets and other exposed wall tops, flashing can help intercept moisture and direct it toward the exterior.
Flashing may be coordinated with:
- Coping
- Roofing membranes
- Parapets
- Masonry joints
- Weep systems
- Counter flashing
Flashing should be properly integrated with the wall and coping system.
Any penetrations or joints should be properly detailed so they do not become pathways for water entry.
Coping and Parapet Walls
Parapet walls are especially important locations for proper coping and flashing.
A parapet extends above the roof line and is exposed to weather from multiple directions.
The wall-top assembly may include:
- CMU
- Grout
- Reinforcement
- Flashing
- Coping
- Counter flashing
- Roofing membrane
- Sealant
- Anchors
The coping and flashing need to work together as part of the overall roof and masonry moisture-control system.
The wall thickness and structural requirements should also be considered when detailing a parapet. The CMU Wall Thickness Guide covers common 4-, 6-, 8-, 10-, and 12-inch CMU wall thicknesses.
CMU Coping Installation
Proper installation is important because even a good coping material can perform poorly if the joints, flashing, or drainage details are incorrect.
Important installation considerations include:
- Properly prepared masonry surface
- Appropriate mortar bed
- Full head joints between coping units
- Properly sealed joints
- Correct overhang
- Adequate slope
- Proper flashing
- Correct anchorage
- Movement joints where required
The coping should be installed consistently so that joints, slope, overhang, and drainage details work together.
Before selecting a cap or coping system, it is also important to understand the actual dimensions of the CMU wall and block. See the CMU Block Sizes Chart for common CMU sizes and dimensions.
Types of CMU Wall Caps
CMU wall caps and coping systems are available in different forms depending on the wall design, exposure, appearance, and drainage requirements.
Common options include:
- Precast concrete caps
- Precast concrete coping
- Concrete block caps
- Cast-in-place concrete caps
- Stone coping
- Metal coping
- Sloped coping units
- Custom architectural caps
The appropriate option depends on the wall type and the performance requirements of the project.
Precast Concrete CMU Coping
Precast concrete coping is commonly used where a durable and finished wall-top surface is required.
Precast coping can provide:
- Consistent dimensions
- Uniform appearance
- Good durability
- Defined overhangs
- Sloped surfaces
- Drip details
It can be used on:
- Parapets
- Boundary walls
- Free-standing walls
- Landscape walls
- Architectural masonry
The coping units should be properly supported and detailed so that water drains away from the masonry wall.
Concrete Block Wall Caps
Concrete masonry units can also be used as part of a wall-cap arrangement.
This approach may be suitable for:
- Garden walls
- Low masonry walls
- Privacy walls
- Landscape walls
- Small boundary walls
The cap arrangement should provide adequate protection from water and should be coordinated with the wall thickness and desired finished appearance.
Where the top of the wall is directly exposed to weather, additional waterproofing or protective detailing may be required depending on the wall design.
Sloped vs Flat CMU Coping
The top surface of a coping system can be designed as either sloped or relatively flat.
| Feature | Sloped Coping | Flat Coping |
|---|---|---|
| Water drainage | Better | Requires careful drainage |
| Standing water | Reduced | Potentially higher |
| Weather protection | Generally favorable | Depends on detailing |
| Appearance | Angled profile | Clean, simple profile |
| Common consideration | Exterior walls | Applications with adequate drainage |
For exposed exterior walls, providing a suitable slope can help direct water away from the wall.
A flat-looking coping can still incorporate a slight drainage slope that may not be obvious from a distance.
CMU Cap and Coping for Retaining Walls
Retaining walls require more than a protective cap because water can also accumulate behind the wall.
A cap helps protect the top of the wall from direct rainfall, but it does not replace the retaining-wall drainage system.
Depending on the wall design, drainage may include:
- Drainage aggregate
- Perforated drain pipe
- Filter fabric
- Waterproofing
- Weep provisions
- Proper backfill
The cap should therefore be considered one part of the overall retaining-wall system.
For material estimation related to concrete and masonry projects, you can also use our:Estimate concrete quantities for related construction work with our Concrete Calculator.
CMU Coping Around Corners
Corners require additional attention because coping units must meet cleanly while maintaining the intended overhang and drainage.
At a corner, the installation may require:
- Mitered coping
- Corner coping units
- Special shapes
- Carefully cut units
- Proper joint alignment
- Continuous flashing where required
Poorly planned corners can result in:
- Uneven joints
- Gaps
- Misaligned overhangs
- Water-collection points
- An inconsistent appearance
Corners should therefore be included in the coping layout before installation begins.
CMU Coping at Wall Intersections
Wall intersections can create additional challenges for cap and coping installation.
Examples include:
- T-intersections
- Cross intersections
- L-shaped walls
- Offset walls
The coping layout should account for:
- Wall direction
- Unit dimensions
- Joint locations
- Overhang
- Drainage
- Movement joints
A detailed layout can reduce unnecessary cutting and help maintain a consistent finished appearance.
CMU Coping Movement Joints
Masonry walls can experience movement caused by:
- Temperature changes
- Moisture changes
- Material movement
- Structural movement
- Settlement
Long wall sections may require movement joints as part of the overall masonry design.
The coping should be detailed so that required movement joints can continue through or interact properly with the wall-top assembly.
Ignoring movement can contribute to:
- Cracked joints
- Cracked coping
- Displacement
- Water penetration
- Damage to adjacent materials
Movement-joint requirements should follow the project design.
CMU Cap and Coping Sealant Joints
Sealant may be used at selected joints and interfaces where movement or water protection needs to be accommodated.
Potential locations include:
- Coping-to-coping joints
- Coping-to-flashing interfaces
- Material transitions
- Movement joints
- Connections between masonry and other building materials
The sealant should be compatible with the materials involved.
A failed sealant joint can allow water to enter the wall-top assembly, so joints should be inspected periodically.
Common CMU Cap and Coping Installation Mistakes
1. Installing Coping Without Proper Slope
A poorly drained surface can allow water to remain on top of the wall.
2. Insufficient Overhang
If the cap does not extend far enough beyond the wall face, water may run directly down the masonry.
3. Missing Drip Detail
Without an effective drip edge or reveal, water can travel back toward the wall face.
4. Poor Joint Sealing
Unsealed or damaged joints can allow moisture to enter the wall-top assembly.
5. Incorrect Flashing Installation
Improperly installed flashing can reduce the effectiveness of the moisture-control system.
6. Ignoring Movement
Long walls and material transitions may require movement accommodation.
7. Poor Corner Planning
Improperly planned corners can produce uneven joints and drainage problems.
8. Using Damaged Coping Units
Cracked or damaged units can create weak points and allow moisture penetration.
CMU Cap and Coping Maintenance
Regular inspection can help identify problems before they become more serious.
Check for:
- Cracked coping
- Damaged mortar joints
- Loose units
- Missing sealant
- Block staining
- Efflorescence
- Water accumulation
- Damaged flashing
- Cracks around joints
- Broken drip edges
Pay particular attention after periods of heavy rain, freezing weather, or significant temperature changes.
CMU Cap and Coping Repair
The correct repair depends on the type and severity of the problem.
Possible repairs may include:
- Repointing mortar joints
- Replacing damaged cap units
- Replacing damaged coping
- Replacing sealant
- Repairing flashing
- Correcting drainage
- Repairing cracks
- Replacing damaged drip details
If moisture continues to appear after a surface repair, the underlying drainage or flashing system should also be investigated.
CMU Cap Installation Checklist
Before completing the wall top, check:
☑ Wall is properly aligned
☑ Cap dimensions match wall width
☑ Overhang is adequate
☑ Drainage slope is provided where required
☑ Drip detail is properly positioned
☑ Mortar joints are properly formed
☑ Flashing is installed where required
☑ Sealant joints are properly detailed
☑ Movement joints are considered
☑ Damaged units are replaced
☑ Water can drain away from the wall
How to Choose the Right CMU Cap or Coping
The appropriate system depends on the wall and its exposure.
Consider:
Wall Type
Determine whether the wall is:
- Free-standing
- Retaining
- Structural
- Architectural
- Parapet
- Boundary wall
Wall Thickness
The cap should provide appropriate coverage for the wall width.
For common CMU wall thicknesses, see our:Learn about common 4-, 6-, 8-, 10-, and 12-inch masonry wall thicknesses in our CMU Wall Thickness Guide.
Weather Exposure
Consider:
- Rain
- Snow
- Ice
- Freeze-thaw cycles
- Temperature changes
- Direct sunlight
Drainage
The wall-top system should provide a clear path for water to leave the surface.
Appearance
Consider:
- Color
- Texture
- Shape
- Finish
- Overhang
- Joint appearance
Maintenance
The system should allow damaged joints, sealants, flashing, and coping units to be inspected and repaired.
CMU Cap and Coping vs Standard CMU
A standard CMU forms the main body of a masonry wall, while a cap or coping protects the top.
| Feature | Standard CMU | Cap/Coping |
|---|---|---|
| Main location | Wall body | Wall top |
| Main purpose | Build wall | Protect wall top |
| Water management | Part of wall system | Major consideration |
| Shape | Usually rectangular | May be sloped or specially shaped |
| Overhang | Usually none | Often used |
| Drip detail | Not normally the main feature | Common design feature |
CMU Cap and Coping FAQs
What is the purpose of a CMU wall cap?
A CMU wall cap protects the exposed top of a masonry wall from weather and helps direct water away from the wall.
What is the difference between CMU cap and coping?
A cap generally refers to a protective top element placed over a masonry wall, while coping commonly refers to a protective wall-top treatment designed particularly to shed water. The terminology can vary between projects.
Should CMU coping be sloped?
For exposed exterior walls, a suitable slope can help direct water away and reduce standing water. The exact slope should follow the project design.
Does CMU coping need an overhang?
An overhang can help move water away from the wall face. The required projection depends on the wall and coping design.
What is a drip edge on CMU coping?
A drip edge or drip reveal helps interrupt water flow and encourages water to fall away from the masonry wall.
Does a CMU cap stop all water penetration?
No. A cap is one part of the moisture-control system. Proper flashing, drainage, joints, sealants, and wall construction are also important.
Can a CMU cap be used on a retaining wall?
Yes, but the cap does not replace the retaining wall’s drainage system. Drainage behind the wall must also be properly designed.
How often should CMU coping be inspected?
Exterior coping should be inspected periodically, especially after severe weather, freezing conditions, or when water staining and cracking become visible.
Related CMU Guides
Learn about moisture absorption and how water can affect concrete masonry units in our CMU Block Absorption & Water Absorption Guide.
Learn about common surface problems and finishing considerations in our CMU Block Surface Finishes Guide.
For information about masonry wall construction and structural considerations, see our CMU Structural Wall Guide.
For information about block geometry and internal components, see our CMU Block Face Shell & Web Thickness Guide.
Final Thoughts
CMU caps and coping protect the exposed top of masonry walls from weather and help control water drainage.
A properly designed system should consider:
- Cap or coping material
- Wall thickness
- Overhang
- Slope
- Drip details
- Flashing
- Mortar joints
- Sealant
- Movement
- Drainage
The best solution depends on the wall type, environmental exposure, construction method, and project requirements.
Proper wall-top detailing can help improve masonry durability, moisture resistance, appearance, and long-term performance.