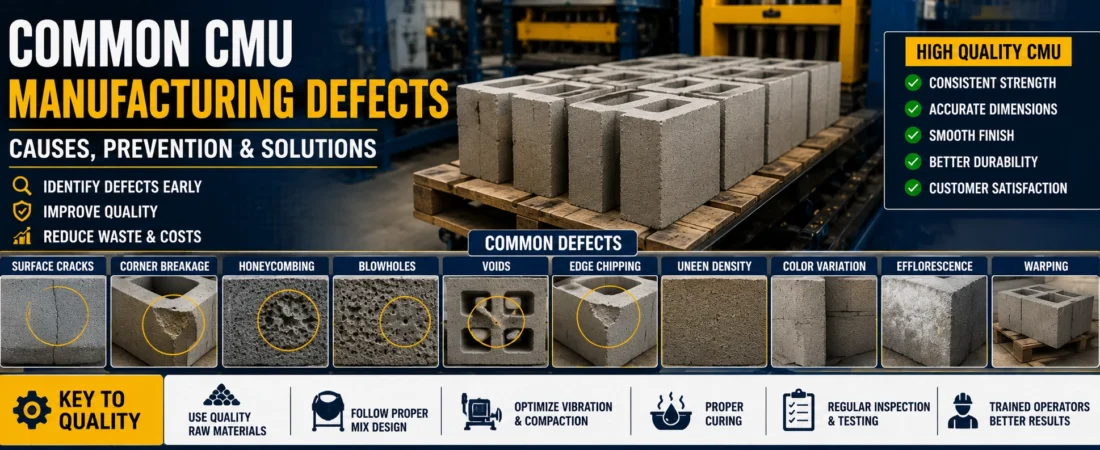
Manufacturing high-quality Concrete Masonry Units (CMUs) requires much more than using good raw materials. Every stage of the production process—from batching and mixing to molding, curing, and storage—must be carefully controlled. Even a small mistake in moisture content, vibration, hydraulic pressure, or curing can result in defective blocks that fail to meet quality standards.
CMU manufacturing defects not only reduce product quality but also increase production costs through material waste, customer complaints, rejected batches, and additional labor. Identifying these defects early and understanding their root causes allows manufacturers to improve efficiency, maintain consistent quality, and produce durable concrete blocks that comply with industry standards.
In this guide, we’ll explore the most common CMU manufacturing defects, their causes, practical prevention methods, and proven solutions to help manufacturers reduce rejects and improve overall production quality.
What Are CMU Manufacturing Defects?
CMU manufacturing defects are imperfections or quality issues that develop during the production of concrete masonry units. These defects may affect the block’s appearance, dimensions, strength, durability, or structural performance.
Some defects are immediately visible after demolding, while others become apparent during curing, transportation, or even after the blocks are installed in a building.
Manufacturing defects can originate from several sources, including:
- Poor raw material quality
- Incorrect concrete mix proportions
- Excess or insufficient water
- Improper vibration
- Low hydraulic pressure
- Worn molds
- Poor curing practices
- Incorrect handling
- Inadequate storage conditions
Why Defect Identification Matters
Many manufacturers focus primarily on increasing production capacity. However, producing thousands of defective blocks every day is far more expensive than producing fewer high-quality blocks.
Early defect identification helps manufacturers:
- Reduce material waste
- Lower production costs
- Improve customer satisfaction
- Increase compressive strength consistency
- Reduce rejected batches
- Improve dimensional accuracy
- Extend mold life
- Increase factory profitability
A strong quality control program should inspect blocks throughout the manufacturing process rather than waiting until production is complete.
Common Types of CMU Manufacturing Defects
Although dozens of manufacturing defects may occur, a small number account for the majority of quality problems in concrete block plants.
The following sections explain the most common defects, their causes, prevention methods, and corrective actions.
Surface Cracks
Surface cracking is one of the most common defects found in concrete masonry units. Cracks may appear immediately after demolding or develop during the curing process.
Some cracks are only cosmetic, while others indicate serious manufacturing problems that reduce block strength and durability.
Common Causes
Surface cracks often result from:
- Excess water in the concrete mix
- Rapid moisture loss
- Improper curing
- Poor-quality aggregates
- High cement content
- Excessive drying temperatures
- Thermal shrinkage
- Improper handling before curing
Prevention
Manufacturers can minimize surface cracking by:
- Maintaining proper water content
- Using a consistent mix design
- Preventing rapid drying
- Following recommended curing procedures
- Controlling production temperatures
- Using quality raw materials
Solutions
If surface cracks appear frequently:
- Check moisture content
- Inspect curing conditions
- Review cement dosage
- Verify aggregate grading
- Monitor ambient temperature
- Improve humidity control
Corner Breakage
Broken corners are commonly seen during block handling, stacking, or transportation. However, the root cause often begins during manufacturing.
Weak corners reduce the appearance and structural reliability of concrete masonry units.
Common Causes
Corner damage may occur due to:
- Low concrete density
- Insufficient vibration
- Improper compaction
- Worn molds
- Premature handling
- Poor pallet alignment
- Improper stacking
Prevention
To prevent corner breakage:
- Maintain proper hydraulic pressure
- Use adequate vibration
- Replace worn molds
- Handle fresh blocks carefully
- Allow sufficient curing before movement
- Use properly aligned pallets
Solutions
Manufacturers experiencing frequent corner failures should inspect:
- Mold condition
- Machine settings
- Hydraulic pressure
- Vibration frequency
- Material consistency
Edge Chipping
Edge chipping occurs when small pieces break away from the edges of concrete blocks.
Although often considered a cosmetic defect, excessive chipping may indicate production or handling problems.
Common Causes
Typical causes include:
- Improper demolding
- Worn mold edges
- Rough transportation
- Poor stacking methods
- Weak concrete mix
- Early handling
Prevention
Reduce edge chipping by:
- Using properly maintained molds
- Handling blocks carefully
- Improving pallet quality
- Allowing sufficient curing
- Using appropriate lifting equipment
Solutions
If chipping becomes common:
- Inspect mold alignment
- Replace damaged molds
- Improve conveyor handling
- Train operators on proper block handling procedures
Honeycombing
Honeycombing refers to small cavities or voids that appear inside or on the surface of a concrete block due to incomplete compaction.
Blocks affected by honeycombing often have reduced strength and poor durability.
Common Causes
Honeycombing usually results from:
- Insufficient vibration
- Low hydraulic pressure
- Dry concrete mix
- Poor mold filling
- Oversized aggregates
- Inadequate compaction time
Prevention
Manufacturers can reduce honeycombing by:
- Adjusting vibration settings
- Maintaining correct moisture content
- Improving mold filling
- Using properly graded aggregates
- Monitoring hydraulic pressure
Solutions
When honeycombing appears:
- Increase vibration duration
- Verify concrete consistency
- Inspect hydraulic performance
- Review aggregate grading
- Check mold filling accuracy
Blowholes
Blowholes are small, rounded air pockets visible on the surface of finished CMU blocks. While they may not always affect structural performance, they reduce the appearance and perceived quality of the product.
Common Causes
Blowholes are often caused by:
- Trapped air in the concrete mix
- Inadequate vibration
- Excessive mold release agent
- Improper moisture content
- Poor compaction
Prevention
Manufacturers can reduce blowholes by:
- Optimizing vibration settings
- Using the correct amount of mold release agent
- Maintaining a consistent concrete mix
- Ensuring complete mold filling
- Monitoring moisture levels
Solutions
If blowholes become a recurring issue:
- Adjust vibration time and frequency
- Review mix consistency
- Reduce excess mold lubricant
- Improve compaction pressure
Surface Pitting
Surface pitting appears as numerous small depressions scattered across the face of the block.
Although usually cosmetic, severe pitting may indicate inconsistencies in the manufacturing process.
Common Causes
- Poor-quality aggregates
- Excess air pockets
- Inadequate vibration
- Segregated concrete mix
- Dirty molds
Prevention
To minimize surface pitting:
- Clean molds regularly
- Use properly graded aggregates
- Maintain consistent vibration
- Prevent segregation during mixing
- Monitor moisture content
Solutions
If pitting persists:
- Inspect aggregate quality
- Improve mold cleaning procedures
- Review batching accuracy
- Check vibration performance
Voids
Voids are empty spaces that remain inside a concrete masonry unit due to poor compaction or improper mold filling. Unlike the intentional hollow cores designed into many CMU blocks, manufacturing voids are random air pockets that weaken the block.
Large internal voids reduce density, compressive strength, and durability.
Common Causes
Voids usually occur because of:
- Insufficient vibration
- Poor mold filling
- Low hydraulic pressure
- Dry concrete mix
- Large aggregate bridging
- Uneven material distribution
Prevention
Manufacturers can reduce void formation by:
- Maintaining proper vibration settings
- Ensuring uniform mold filling
- Using a consistent concrete mix
- Monitoring hydraulic pressure
- Using well-graded aggregates
Solutions
If internal voids become common:
- Inspect the feed drawer
- Increase compaction time
- Verify machine calibration
- Review aggregate grading
- Check moisture consistency
Uneven Density
Concrete blocks should have uniform density throughout the entire unit. Density variations create weak zones that reduce overall structural performance.
Blocks with uneven density may appear normal externally but often fail compressive strength testing.
Common Causes
Density variation may result from:
- Uneven mold filling
- Inconsistent vibration
- Variable moisture content
- Poor batching accuracy
- Hydraulic pressure fluctuations
Prevention
Maintain consistent production by:
- Calibrating batching equipment
- Monitoring moisture content
- Keeping vibration settings constant
- Inspecting hydraulic performance regularly
- Using consistent raw materials
Solutions
Manufacturers should:
- Verify batching accuracy
- Inspect vibration motors
- Test hydraulic pressure
- Review production records
- Replace worn machine components when necessary
Low Compressive Strength
Low compressive strength is one of the most serious manufacturing defects because it directly affects the structural performance of concrete masonry units.
Weak blocks may crack during handling or fail to meet building code requirements.
Common Causes
Poor compressive strength often results from:
- Incorrect cement content
- Excess water
- Poor aggregate quality
- Inadequate compaction
- Improper curing
- Poor mix design
- Early drying
- Inconsistent batching
Prevention
Manufacturers should:
- Follow a proven mix design
- Use quality raw materials
- Maintain correct water-cement ratio
- Ensure proper vibration
- Apply sufficient hydraulic pressure
- Follow recommended curing procedures
Solutions
If blocks consistently fail strength tests:
- Review cement dosage
- Verify batching accuracy
- Improve curing conditions
- Test aggregate quality
- Inspect machine performance
Color Variation
Customers expect concrete blocks from the same production batch to have a consistent appearance.
Significant color variation may indicate inconsistent manufacturing conditions.
Common Causes
Color differences may occur because of:
- Variable cement batches
- Moisture inconsistency
- Different aggregate sources
- Uneven curing
- Pigment dosage variation
- Temperature fluctuations
Prevention
Maintain uniform appearance by:
- Purchasing consistent raw materials
- Controlling moisture content
- Using accurate batching equipment
- Following standardized curing procedures
- Maintaining consistent production schedules
Solutions
Manufacturers experiencing color variation should:
- Standardize material suppliers
- Improve batching accuracy
- Maintain curing consistency
- Inspect moisture levels
Efflorescence
Efflorescence appears as a white, powdery deposit on the surface of concrete masonry units.
Although primarily an aesthetic issue, excessive efflorescence may concern customers and indicate moisture-related problems.
Common Causes
Efflorescence develops when:
- Water dissolves soluble salts
- Moisture moves through the concrete
- Salts reach the surface
- Water evaporates, leaving mineral deposits
Prevention
Manufacturers can reduce efflorescence by:
- Using clean aggregates
- Minimizing excess moisture
- Improving drainage
- Following proper curing procedures
- Protecting stored blocks from excessive rain
Solutions
If efflorescence appears:
- Allow the surface to dry naturally
- Remove deposits using a soft brush
- Improve storage conditions
- Reduce moisture exposure
- Review raw material quality
Warping
Warping occurs when concrete blocks lose their intended shape after manufacturing.
Although relatively uncommon, warped blocks often fail dimensional inspections.
Common Causes
Warping may result from:
- Uneven drying
- Rapid moisture loss
- Improper curing
- Premature handling
- Uneven support during curing
Prevention
Reduce warping by:
- Providing uniform curing conditions
- Supporting pallets evenly
- Maintaining consistent humidity
- Preventing rapid temperature changes
Solutions
Manufacturers should:
- Review curing procedures
- Improve pallet support
- Reduce temperature variation
- Inspect storage conditions
Dimensional Inaccuracy
Concrete masonry units must meet strict dimensional tolerances to ensure proper wall alignment and mortar joint consistency.
Oversized or undersized blocks create installation problems on construction sites.
Common Causes
Dimensional errors often occur because of:
- Worn molds
- Machine misalignment
- Hydraulic pressure variation
- Uneven compaction
- Poor mold maintenance
Prevention
Manufacturers should:
- Inspect molds regularly
- Replace worn components
- Calibrate equipment
- Monitor hydraulic pressure
- Verify machine alignment
Solutions
If dimensional variation increases:
- Replace worn molds
- Recalibrate the machine
- Verify compaction settings
- Inspect mold locking mechanisms
Mold Marks
Mold marks appear as unwanted lines, scratches, or impressions on the surface of finished blocks.
These defects usually affect appearance rather than structural performance.
Common Causes
- Damaged mold surfaces
- Dirty molds
- Excess mold release agent
- Worn steel components
- Improper cleaning
Prevention
Manufacturers should:
- Clean molds after each production shift
- Inspect mold surfaces regularly
- Apply mold release agents correctly
- Replace damaged mold inserts
Solutions
Persistent mold marks usually require:
- Mold polishing
- Mold repair
- Mold replacement
- Improved cleaning procedures
Rough Surface Finish
A rough or uneven surface reduces the visual quality of concrete blocks and may indicate poor production control.
Common Causes
- Inadequate vibration
- Poor aggregate grading
- Dry concrete mix
- Dirty molds
- Low compaction pressure
Prevention
Maintain smooth block surfaces by:
- Using consistent aggregate grading
- Maintaining proper moisture content
- Cleaning molds frequently
- Optimizing vibration and compaction settings
Solutions
If rough surfaces become common:
- Review vibration settings
- Inspect mold cleanliness
- Check aggregate quality
- Verify hydraulic pressure
Delamination
Delamination occurs when one layer of concrete separates from another within the block. Although this defect is less common than cracking or honeycombing, it can significantly reduce the block’s structural integrity.
Delaminated blocks may appear sound externally but can separate under load or during handling.
Common Causes
Delamination is often caused by:
- Poor bonding between concrete layers
- Interrupted production cycles
- Inconsistent moisture content
- Insufficient compaction
- Segregated concrete mix
- Improper vibration
Prevention
Manufacturers can prevent delamination by:
- Maintaining a uniform concrete mix
- Avoiding production interruptions
- Ensuring proper vibration
- Applying adequate hydraulic pressure
- Monitoring moisture consistency
Solutions
If delamination becomes frequent:
- Inspect batching accuracy
- Review vibration settings
- Improve mix consistency
- Verify hydraulic compaction pressure
Segregation
Segregation occurs when the heavier aggregates separate from the cement paste and finer materials.
Instead of forming a uniform concrete mixture, materials separate during mixing, transportation, or mold filling.
Segregation produces weak, inconsistent concrete blocks with poor appearance.
Common Causes
Segregation may occur because of:
- Excess water
- Poor aggregate grading
- Over-mixing
- Improper material handling
- Long transportation distances
- Excessive vibration
Prevention
Reduce segregation by:
- Using the correct water-cement ratio
- Following an approved mix design
- Avoiding over-mixing
- Using properly graded aggregates
- Maintaining consistent moisture content
Solutions
If segregation is observed:
- Review batching procedures
- Reduce excess water
- Improve aggregate grading
- Adjust mixing time
- Monitor conveyor handling
Block Sticking to the Mold
Freshly molded concrete blocks should release cleanly from the mold during demolding.
If blocks stick to the mold, production slows, block damage increases, and mold wear accelerates.
Common Causes
Block sticking often results from:
- Dirty molds
- Worn mold surfaces
- Improper mold release agent
- Excess moisture
- Low compaction
- Rough mold interiors
Prevention
Manufacturers should:
- Clean molds regularly
- Apply mold release agent evenly
- Replace worn molds
- Maintain proper moisture content
- Inspect mold surfaces frequently
Solutions
When sticking occurs:
- Clean the mold thoroughly
- Inspect mold wear
- Adjust moisture content
- Apply the correct amount of release agent
- Replace damaged mold liners if necessary
Broken Webs
The internal webs of hollow concrete blocks provide strength while reducing weight.
Broken or incomplete webs weaken the block and reduce its load-carrying capacity.
Common Causes
Broken webs are commonly caused by:
- Poor mold filling
- Excessive vibration
- Low concrete strength
- Premature handling
- Worn mold cores
Prevention
To minimize broken webs:
- Fill molds uniformly
- Maintain proper vibration settings
- Allow sufficient curing
- Replace worn mold cores
- Handle fresh blocks carefully
Solutions
Manufacturers should:
- Inspect mold inserts
- Review machine calibration
- Improve curing conditions
- Increase concrete consistency
Broken Faces
Broken faces occur when large sections of the front or back surface chip away during demolding, handling, or transportation.
This defect significantly reduces the commercial value of finished blocks.
Common Causes
Broken faces often result from:
- Weak concrete
- Early handling
- Rough transportation
- Improper stacking
- Damaged pallets
- Excessive impact
Prevention
Reduce face damage by:
- Following proper curing procedures
- Improving handling techniques
- Using quality pallets
- Training forklift operators
- Stacking blocks correctly
Solutions
If broken faces increase:
- Review handling procedures
- Improve curing time
- Replace damaged pallets
- Inspect transportation equipment
Incomplete Mold Filling
Incomplete mold filling occurs when the concrete mixture fails to completely occupy the mold cavity.
This defect produces undersized blocks with missing corners, weak sections, or irregular shapes.
Common Causes
- Insufficient concrete feed
- Feed drawer malfunction
- Dry concrete mix
- Poor vibration
- Conveyor interruptions
- Incorrect machine settings
Prevention
Manufacturers should:
- Calibrate feed systems
- Maintain proper moisture content
- Inspect conveyors regularly
- Verify feed drawer operation
- Monitor material flow
Solutions
If incomplete filling becomes common:
- Increase feed volume
- Adjust machine timing
- Review concrete consistency
- Inspect hopper discharge
- Service the feeding mechanism
Excess Moisture Defects
Using too much water in the concrete mix creates several manufacturing problems.
Excess moisture may initially improve workability, but it often reduces block quality after curing.
Common Problems Caused by Excess Water
- Surface cracking
- Lower compressive strength
- Increased shrinkage
- Dimensional variation
- Slow strength development
- Poor edge quality
- Segregation
- Efflorescence
Prevention
Manufacturers should:
- Measure water accurately
- Monitor aggregate moisture
- Adjust mix proportions daily
- Follow the approved mix design
- Perform regular moisture testing
Dry Mix Defects
A concrete mix with insufficient moisture can also create serious manufacturing defects.
Very dry concrete often fails to compact properly inside the mold.
Common Problems Caused by Dry Mixes
- Honeycombing
- Surface voids
- Rough texture
- Weak bonding
- Low density
- Poor edge formation
- Blowholes
- Incomplete mold filling
Prevention
Avoid overly dry mixes by:
- Measuring moisture content accurately
- Monitoring aggregate absorption
- Adjusting water for weather conditions
- Using calibrated batching equipment
Manufacturing Stage vs. Common Defects
| Manufacturing Stage | Common Defects |
|---|---|
| Raw Material Storage | Contamination, Color Variation |
| Batching | Incorrect Mix Ratio, Low Strength |
| Mixing | Segregation, Poor Consistency |
| Material Feeding | Incomplete Mold Filling |
| Mold Filling | Voids, Honeycombing |
| Vibration | Blowholes, Rough Surface, Density Variation |
| Hydraulic Pressing | Low Strength, Uneven Density |
| Demolding | Corner Breakage, Edge Chipping, Broken Faces |
| Curing | Cracking, Warping, Efflorescence |
| Storage & Transportation | Chipping, Broken Corners, Face Damage |
Root Cause Analysis
When a manufacturing defect is discovered, manufacturers should identify the source rather than simply replacing damaged blocks.
Most production defects originate from one of the following areas:
Raw Materials
Inspect:
- Cement quality
- Aggregate grading
- Sand cleanliness
- Water quality
- Admixture dosage
Mix Design
Review:
- Water-cement ratio
- Aggregate proportions
- Moisture consistency
- Cement content
Machine Settings
Inspect:
- Hydraulic pressure
- Vibration frequency
- Cycle time
- Feed system
- Mold alignment
Mold Condition
Inspect molds for:
- Wear
- Cracks
- Rust
- Surface damage
- Dimensional accuracy
Curing Process
Evaluate:
- Temperature
- Humidity
- Curing duration
- Moisture retention
Handling and Storage
Check for:
- Improper stacking
- Forklift damage
- Premature movement
- Uneven pallet support
- Weather exposure
Daily Defect Inspection Checklist
A simple daily inspection routine helps identify problems before they affect an entire production batch.
✔ Check block dimensions
✔ Inspect corners and edges
✔ Examine surface finish
✔ Look for cracks and voids
✔ Verify color consistency
✔ Test block density
✔ Monitor curing conditions
✔ Inspect molds for wear
✔ Verify machine calibration
✔ Record all production defects for trend analysis
A consistent inspection program, combined with the practices outlined in our CMU Block Quality Control Guide, helps reduce defects, improve efficiency, and maintain consistent product quality.Best Practices to Reduce CMU Manufacturing Defects
Producing high-quality concrete masonry units consistently requires more than modern equipment. A successful manufacturing operation combines quality raw materials, properly maintained machinery, trained operators, and an effective quality control system.
The following best practices can significantly reduce manufacturing defects while improving production efficiency.
1. Use High-Quality Raw Materials
Every quality block starts with quality ingredients.
Manufacturers should regularly inspect:
- Cement quality
- Aggregate cleanliness
- Sand grading
- Water quality
- Chemical admixtures
Even the best production equipment cannot compensate for poor-quality raw materials.
2. Follow a Consistent Mix Design
Changing mix proportions from one batch to another leads to inconsistent block quality.
Always:
- Measure materials accurately
- Maintain the correct water-cement ratio
- Monitor aggregate moisture
- Calibrate batching equipment regularly
A standardized mix design improves compressive strength, density, and surface finish.
3. Maintain Proper Moisture Content
Moisture content is one of the most important factors affecting CMU quality.
Too much water can cause:
- Cracking
- Shrinkage
- Low strength
- Segregation
- Efflorescence
Too little water can result in:
- Honeycombing
- Rough surfaces
- Poor compaction
- Surface voids
- Weak blocks
Operators should test moisture levels throughout the day, especially when weather conditions change.
4. Inspect Molds Frequently
Worn molds gradually reduce block quality.
Inspect molds for:
- Surface wear
- Rust
- Cracks
- Bent components
- Dimensional accuracy
Replacing worn molds early is usually much less expensive than producing thousands of defective blocks.
5. Optimize Vibration and Hydraulic Pressure
Proper compaction removes trapped air while achieving the required density.
Manufacturers should regularly verify:
- Vibration frequency
- Vibration duration
- Hydraulic pressure
- Cycle time
- Machine synchronization
Small adjustments can significantly improve block quality.
6. Follow Proper Curing Procedures
Many manufacturing defects develop after demolding because of poor curing.
Proper curing helps:
- Increase compressive strength
- Reduce cracking
- Improve durability
- Minimize shrinkage
- Reduce efflorescence
Maintain consistent curing temperature and humidity throughout the curing period.
7. Train Machine Operators
Even automated block machines require experienced operators.
Training should include:
- Machine operation
- Mix consistency evaluation
- Daily inspections
- Equipment maintenance
- Safety procedures
- Quality control practices
Experienced operators often detect production problems before they become major defects.
8. Perform Daily Machine Maintenance
Preventive maintenance minimizes unexpected production problems.
Daily maintenance should include:
- Cleaning molds
- Lubricating moving parts
- Inspecting hydraulic hoses
- Checking vibration motors
- Tightening loose bolts
- Cleaning sensors
- Inspecting conveyors
Well-maintained machines produce more consistent blocks and experience fewer breakdowns.
9. Implement a Quality Control Program
Every production batch should be inspected before shipment.
Quality control should include:
- Visual inspection
- Dimensional checks
- Density testing
- Compressive strength testing
- Moisture monitoring
- Surface quality inspection
Maintaining accurate production records also helps identify recurring problems and improve long-term manufacturing performance.
Frequently Asked Questions
What is the most common CMU manufacturing defect?
Surface cracks, corner breakage, edge chipping, honeycombing, and low compressive strength are among the most common defects found in concrete masonry units. Most of these issues result from poor mix design, improper compaction, or inadequate curing.
What causes honeycombing in CMU blocks?
Honeycombing is usually caused by insufficient vibration, low hydraulic pressure, poor mold filling, oversized aggregates, or a concrete mix that is too dry.
Why do CMU blocks crack after curing?
Cracking often develops because of excessive water, rapid moisture loss, poor curing conditions, thermal shrinkage, or an improper concrete mix design.
How can manufacturers improve block strength?
Manufacturers can improve compressive strength by using quality raw materials, maintaining the correct water-cement ratio, ensuring proper vibration and compaction, and following recommended curing procedures.
Why do concrete blocks show different colors?
Color variation usually results from inconsistent raw materials, changing moisture levels, uneven curing conditions, or inaccurate pigment dosage.
Can worn molds affect block quality?
Yes. Worn molds can produce dimensional inaccuracies, rough surfaces, broken corners, poor edge quality, and inconsistent block sizes. Regular mold inspection and replacement are essential for maintaining product quality.
How often should CMU manufacturing equipment be inspected?
Basic inspections should be performed daily, while detailed maintenance and calibration should follow the manufacturer’s recommended maintenance schedule.
Final Thoughts
Manufacturing defects are an inevitable challenge in concrete block production, but most defects are preventable with proper process control. Consistent raw materials, accurate batching, well-maintained equipment, proper vibration and compaction, controlled curing, and regular quality inspections all contribute to producing durable, high-quality CMUs.
Rather than treating defects as isolated problems, manufacturers should analyze their root causes and implement corrective actions throughout the production process. A proactive quality management approach reduces waste, improves customer satisfaction, extends equipment life, and helps ensure that every concrete masonry unit meets the required performance standards.
Related Calculators
- CMU Block Calculator
- Concrete Calculator
- Cement Calculator
- Sand Calculator
- Gravel Calculator
- Mortar Calculator